Connect an NFC reader to your Shopify POS location so customers can identify themselves with a tap of their loyalty card.
Last updated: March 20, 2026
Only users on the Enterprise plan can access NFC technology in their stores. This feature allows them to identify customers' in-store purchases with just a tap.
Let's review how to add a new NFC reader and how the connection with a specific store's POS works.
1
Add NFC Reader to a location
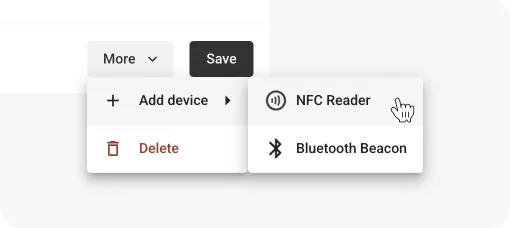
To add an NFC Reader, go to the admin app and go to Settings > Location & Devices. Then, choose the location where you will connect the NFC Reader.
This location must always be synchronized with Shopify, not one created in JeriCommerce.
Add NFC Reader on a location
2
Connect POS to JeriCommerce
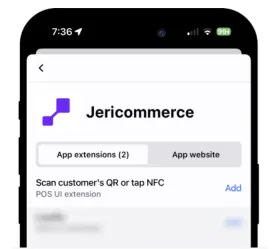
Now it's time to connect a specific POS to JeriCommerce. You need to add the JeriCommerce Tile on the POS called "Scan Customer."
After adding it, you should be able to tap it and scan a QR with the device's camera or a QR scanner gun.
While this may not be essential in this case, it ensures that everything is set up correctly.
Add scan QR or tap NFC tile on POS
3
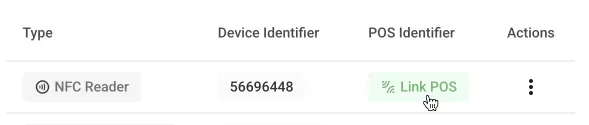
Link reader to POS
Now, the last step is to link both devices, which should be very easy. Go to the location where you added the device earlier, and you should see the "Link POS" button. Click on it and choose the POS you want to link. That's it!
Now you can test it with your shop's loyalty card. Just tap it with your phone, whether it's Android or Apple, and you should see the current cart linked to the customer in less than 2 seconds.
 Add NFC Reader on a location